

Option A: Homebrew
The fastest path. Fermata is distributed as a Homebrew cask on a self-hosted tap.auto_updates true, so Homebrew steps out of the way after install. Routine updates arrive through Sparkle inside the app; you only need brew upgrade --cask fermata for major version bumps.
Option B: Direct DMG download
Grab the DMG from fermata.run. The build is signed with a Developer ID certificate and notarized by Apple, so Gatekeeper opens it without a fight. Mount the DMG, drag Fermata to Applications, eject. Done. Auto-update is on by default either way. New releases land via Sparkle and prompt you the next time you launch.Before your first piece
Fermata hosts the Claude Code CLI and opens pull requests through the GitHub CLI. Neither is bundled, so set both up first.1
Install and authenticate the Claude Code CLI
Fermata drives Claude Code; it does not replace it. Anthropic’s Claude Code docs walk you through the install and the login. If
claude runs in your terminal and answers a prompt, Fermata finds it. It checks a path you configured first, then your PATH, then the usual install locations.Fermata runs on your own Claude setup and your own billing. To run the engine through Amazon Bedrock or Google Vertex instead of Anthropic directly, see models and providers.2
Install the GitHub CLI and log in
gh does more than open pull requests: it also backs Clone from GitHub… and, on the Edge channel, the one-click way to connect a GitHub Stream Source. Install it and authenticate before your first piece.gh, cloning a repository needs gh logged in, and connecting a GitHub Stream Source falls back to a pasted access token without it. Everything else in a run, including Merge Back, which merges with plain git, works either way.First launch
Open Fermata from Applications. The first thing you see is a one-time “Privacy” notice with two switches, and nothing is transmitted until you answer it. See privacy and data for what each switch sends. Past that, you land on the Welcome view, with two ways to get a project open: Open Project for a repository already on disk, and Clone from GitHub… for one that is not. The same Clone from GitHub… button sits in the project picker and in the File menu, so you never have to come back to Welcome to reach it. Picking Open Project asks for any git repository on disk. Fermata reads it, sets up its workspace, and drops you in on Home. Clone from GitHub… opens a window that checks forgh first: without it, or without a login, the window tells you to install gh or run gh auth login and stops there. Once gh is ready, fill in a Clone URL (a plain text field, not a repository browser) and pick a Destination: “Fermata Folder” clones into ~/Fermata, “Custom Folder…” clones into a folder you choose. If the URL already has a clone at that destination, the window offers Open as Project instead of cloning it again. A successful clone drops you in on Home the same way opening a folder does.
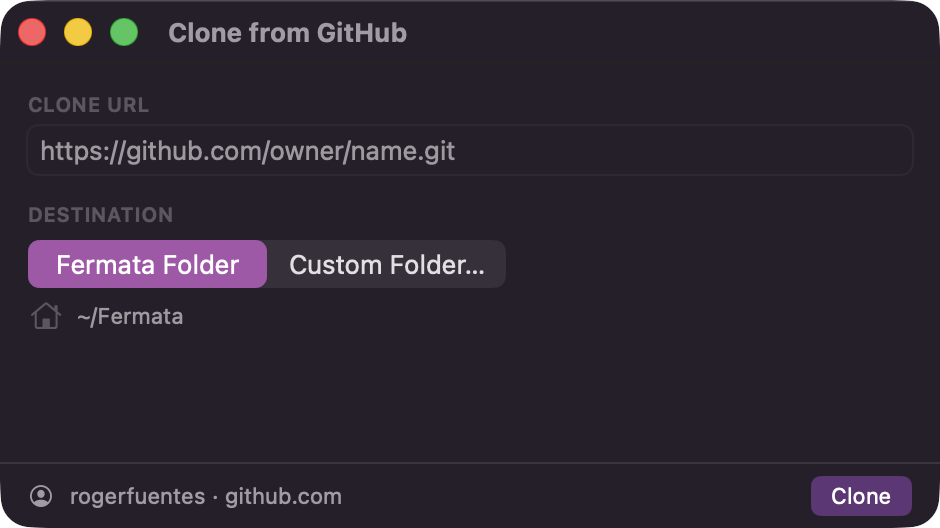
Clone from GitHub: the URL field and the Fermata Folder destination
Settings
Click the gear icon in the bottom-left corner of the sidebar. Settings hold the defaults for new work: permission profile, model, effort, worktree conventions, and the gates. Anything you set here applies going forward, and you can still override most of it per project and per piece. See where defaults live for which setting wins.Settings: the defaults every new piece and session starts from